Monday, May 18, 2015

DIY Baby Shortall

I searched for my next project on Pinterest and saw this blog where you can make shortalls from an adult shirt. I remembered I had some of Hubby's polo shirts I wanted to get rid of so I looked up tutorials for polo shirts. This one showed how to resize an adult polo to a kid size. 


I skimmed both blogs and decided to try to make a polo shortall from Hubby's polo shirt. It was an old shirt so I didn't mind if I messed up. 
On Saturday when both kids were napping, I busted out my sewing scissors and started to cut. 
I'm not very good at reading directions or working with patterns so I skimmed the blog pictures and grabbed one of BBC's shortalls to use as a template. 


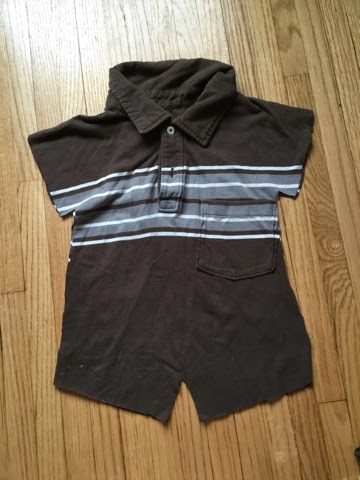
I cut about an inch around the shortall on the left side then folded the shirt in half and cut based on the other half so that they would be symmetrical. 


I ended up with this cutout. 

I detached the collar by pulling out the stitches. 


Then I sewed the edges of the leg holes and arm holes to create a hem. And then I sewed the pieces together at the tops and the sides- leaving the section in between the legs open so I could add snaps later.
After everything was sewn together, I had to cut the collar to fit the head opening and pinned it to the shirt.


 I cut the collar from one side thinking I could save myself from having to sew both sides. I learned that next time I should cut from both sides so that it's symmetrical. 


I added the snaps using this snap kit. The kit was easier than when I tried to attach snaps without the kit for the quiet book, but it was still pretty frustrating. 


This is the final product- not too bad for an evening project. It would've gone by faster if my thread didn't keep bunching and breaking- just a reminder that I'm still not crafty lol! But easy enough that I'm excited to try it again with other shirts! Next time I'll have to make the legs a little slimmer and longer. I think I will also cut the crotch a little higher so the pants are longer and the torso is shorter. 


Pretty cute to see BBC wearing outfits that Hubby wore. 


Wednesday, May 13, 2015

Quiet book: Itsy Bitsy Spider

I came across this cute quiet book page for the itsy bitsy spider.

I liked how this blog had the spider go up and down on a string. I searched on Pinterest for other ideas and came across this blog. I liked this version even better. It was cuter and I liked how it had the flip to go from sunny to raining. 

For my version, I did a little bit from both blogs. I pretty much modeled it after the second flip blog. I made the template for the water spout from that page (tracing it from my computer) but I decided not to do the flip for the spout. 
I spent a little extra time on the house- I decided it needed to be a brick house lol. I'm not sure why I decided to make it so complicated but it turned out nicely. 

Work in progress 

For the spider, I just cut out a black oval from stiff felt and then free styled some legs and sewed the legs to the body. 
I stitched in a smile using red thread and on the back of the spider, I sewed on a black strip so I could slip ribbon through. 


I had googly eyes so I used those instead of sewing eyes because I think they look cuter than beady sewn eyes.
Work in progress: spider with some of the bricks for the brick wall 

I threaded a ribbon through the back of the spider and then attached the ribbon to the top and bottom of the water spout. 

For the background, I used simple green felt for the ground which I fringed the top to make it look like grass. I cut two squares- one light blue and one dark blue and I sewed one edge of each color together. I then sewed the opposite edge of the dark blue to the top of the page and the other edge of the light blue below the grass. Then I sewed the middle of each color to the Pellon beneath it so that the square folded and created the flip.


I added grey clouds to the dark blue side. I just free style cut the clouds and added a red stitched smile and googly eyes before sewing it to the page. I liked how the one blog had the ribbon as the rain and originally I was going to make it like they did with felt raindrops. But when I cut out the raindrops I decided it wouldn't look good once it was stitched to the ribbon because it was too small. Instead, I decided to use the light blue heart beads that I had leftover from the abacus page I made.


In retrospect, I should have sewed the ribbon under the clouds BEFORE I sewed the clouds to the page. But I didn't so it was a bit more challenging to add. I had to tuck the ribbon in between one of the stitches and the try to sew the ribbon down by going over the stitching in the clouds. It was much more complicated than it needed to be. The lesson here is plan out your page BEFORE you start sewing to avoid making extra work for yourself. 

For the light blue side, I added a sun, which was just a yellow circle with a red stitched smile and googly eyes. I was going to add sun beams but it looked dumb. The page seemed pretty bare so I added a white cloud and a flower to it. I wanted to add a bee to the page as well because the sunny page still looked bare even with the flower but if I added the bee, the rainy page just like chaotic since it had the raindrops as well. 


Since the flower had to be on both the rainy and sunny page, I basically cut out two of each shape/color and then sewed them to each page. I tried to make them look as identical as I could. I added googly eyes to each flower and one stem for both pages.

This is another page that Koala likes but she mostly plays with when I play with her because she likes when I sing the itsy bitsy spider song. Although these days, I sometimes catch her playing with it and going through motions of having the spider climb up, then the rain falls and the spider falls down. But she still enjoys it best when I sing it to her. 


Wednesday, April 29, 2015

Quiet book: Lost sheep


When looking up pages for Koala's quiet book, I discovered that a lot of people use the quiet books to entertain their children during church so there were quite a few Bible pages. One Bible quiet book page was to find the lost sheep
I took this idea and decided to make a background like this forest page
I liked how the page had different layers and got the idea that each layer could be a hiding spot for the sheep.
 I started off with the bottom layer and made a mountain. I sewed the bottom and side but left an open pocket where the sheep could hide. I reinforced the mountain with Pellon to make it more sturdy. I added the tree and once again left open a pocket where the leaves were. Then I added the bush and pine tree. Next was the grassy hill and last was the rock that rolls away using a brad. Each piece was reinforced with Pellon and then sewed to the page leaving a pocket for where the sheep can fit in. Most of my other pages I hand sewed but it was easier to use my sewing machine for this page.

This bottom picture shows the rock rolled away. 

For the sheep, I saw this cute sheep on Pinterest. 
Even though a template was given, I ended up making my own by tracing a picture of the sheep from my computer screen. I hand sewed the sheep and stuffed a little bit of cotton in it to give it a little depth. 

Here's a picture of the six possible hiding places for the sheep. 

I really liked how this page turned out. Koala doesn't really play with it by herself because it's more of a page to play with someone. But when we were on the plane for our trip, we played with it for a while. I would hide the sheep and she would find it. 
She still will briefly play with it now when she's flipping through the book. She'll say 'where's the sheep?' and then find it from where I put it from the last time she used it. Then once she finds it, she moves onto the next page. 


Wednesday, April 15, 2015

Craft Organization

Now that I'm using the sewing machine a lot more and I have a lot more craft supplies for my bibs and quiet book, I needed to find a way to organize it all. My computer desk was cluttered with felt and thread, etc. and my dining room had the sewing machine and all the fabric, velcro, etc for the bibs.
I started off by buying these magnetic spice rack  containers to store my odds and ends like googly eyes, grommets, etc. 


I bought the rack that came with 6 containers from Bed, Bath and Beyond (using a coupon of course!) and then some extra containers on Amazon.

I also used these jars that I had laying around to store my scrap material and my trash and I kept the jars on the work area near me for easy access. (I think these jars are from IKEA. I bought them years ago but I think they still sell them.)


It sounds lazy but it's a lot easier sticking a small piece of thread in that little jar than trying to get it to fall into the garbage can on the floor.  

I also organized all my fabric for my bibs. Before, I had them stacked in a storage tote and had to dig through the pile to find the fabric I wanted. I searched Pinterest for ways to organize fabric and liked the idea of folding them onto cardboard (inspired by this blog).

saw/read that comic board cardboard was a good option for this so I bought some off Amazon and wrapped my fabric around them and stored them in a cardboard box that I planned on decorating. 

I still felt I needed more organization and a place to store the sewing machine. I don't quite remember how but one day while on Pinterest, (I think I was searching sewing tables or organization) I came across the Sewing Box that I saw on this blog.


I really liked it but it was $1300! 

I later searched for other options and decided to check out IKEA since they have affordable furniture and I came across the Hemnes Secretary desk.


I thought it would be perfect to store the sewing machine and I could just pull it out onto the ledge part when I need it. Plus there was plenty of storage for all my supplies and fabrics! 

After putting it off for a long time, I finally made the drive to the nearest IKEA and picked up the desk.  It had been a while since I'd been to IKEA so I totally forgot how much stuff they carry. I not only picked up the desk but I bought a bunch of organization stuff for my craft desk. 

I picked up this tiered planter that I planned to use for storing random items on my desk. 


I also got a magnetic board for my spice rack containers. Originally, I wanted to hang it in the desk but I couldn't figure a good way to hang it and worried that the doors wouldn't shut properly. So I just stacked them on the magnetic board which makes it easier to slide in and out of the one shelf. 


I bought some Kasset boxes for random larger items. I actually already had these Kasset boxes in black but decided to buy some white ones since the desk was white. 


And I also picked up the Kasset magazine racks which I thought would be easier to organize the fabric by style/color and would look nicer. 


The magazine racks were taller than the boards but they still worked nicely to organize my fabric. 

After putting together my desk and putting all my supplies in, I looked at it and it looked so sterile because everything was white. I thought about using my black Kasset boxes so that I had black and white boxes but when browsing Pinterest (seriously, Pinterest is a great place to get ideas!), I came across this blog that showed how she decorated IKEA boxes to look like Kate Spade boxes using electrical tape. Genius! 


I decided to decorate the white boxes to make my desk look cuter and less sterile. The electrical tape was cheap and it didn't take very long to decorate the box and magazine racks. 


I followed the advice of the blog and put a piece of electrical tape in the corners as a guide for where to line up the next stripe. (Left picture)

Magazine rack 

I decorated some of the boxes with stripes, some with polka dots and some I left plain white. I decided to use black dot sticker which I bought on Amazon. These 1 inch dots were perfect for the boxes- although it was a lot more than I needed.

Dot magazine rack, Dot box, and magazine rack with bin fabric

I also decorated the planter too. 

The last thing I wanted was to find a small tray or box to fit in the small shelves on the left side of the sewing machine. 


Unfortunately I couldn't find anything that fit the dimensions that I needed so I decided to make a box. I found that the Cheerios box I had from Costco fit perfectly in the space. 


1. I cut off the one large side and made it into a tray. 
2. Then I covered the sides of the box with a long strip of wrapping paper that I folded in half to also cover the inside (I turned the wrapping paper over so that the box was white.) 
3. The finished sides. 
4. I cut a piece of paper the size of the large side of the box and stuck it on the bottom of the inside of the 'tray.' Then I covered the outside with polka dots. 
I only needed to make two since I had my spice rack tins in one spot. 


(Note: I actually discovered that the tray doesn't fit in the middle shelf when the secretary desk is closed because the one part of the desk goes into that shelf. So instead of putting a tray there, I have my sewing box in there that holds all my thread).


I love how everything turned out and how organized everything is now. Now if only I could get the rest of my office organized... ☺️


Wednesday, April 1, 2015

Quiet book: Corduroy

One of Koala's favorite books to read is Corduroy- a classic that I remember from when I was little. I thought that making a button page based on this book would be perfect. 
The idea behind the page was to have buttons for Corduroy's straps so that Koala would learn how to button things. Unfortunately, in terms of functionality, I feel like this page is a bit of a fail. The page looks exactly how I wanted it to- like the cover of the book.

 I actually traced the cover off my computer screen so that the letters, etc were exactly like the book. 
Even though Corduroy only has one button in the book, I put buttons on both straps to give the page more than just one thing for Koala to do. 
The straps lift up and can be buttoned and unbuttoned. 

But the button holes on the straps are too small for Koala to button. Maybe she'll use the page when she gets older but for now, it's just a pretty page that doesn't get much use. #fail

Thursday, March 26, 2015

Quiet book: The Wheels on the Bus/Pigeon

For this page, I combined the Wheels on the bus page with the Pigeon from Don't let the Pigeon Drive the Bus!

I got my inspiration for the bus page from these two blogs: this and this.

I actually used the bus from the second blog as my template (traced from my computer screen like most of my templates). 
I sewed the bus onto background felt and left open the bottom of the window so that the pigeon could ride in there. That bottom part of the window is reinforced with Pellon to make it more sturdy when putting the pigeon in. 

Page in progress: Koala had fun with it even before it was finished- she stuck her toy frog in the bus.

For the pigeon, I traced the template from the actual book. The big pigeon books are about the size of the quiet book pages so the pigeon was just the right size for the template. I made the front design and sewed all the pieces onto Pellon. Then since pigeon was going to be taken in and out, I figured I should cover the back of the Pellon so I added felt to the backside as well. Since it has 2 layers of felt and the Pellon, it's pretty sturdy, 


I added wheels that I cut out of black stiff felt. (You can find some large sheets of stiff felt in limited colors like black, dark blue, and sometimes red but they're about a dollar a sheet and make just one page if you use it for the background. Since it costs a lot more than using the white Pellon, I usually use the stiff felt for small things. ) 
I found big orange brads that I put as the hub caps so that the wheels turn. (The wheels of the bus go round and round... Something you can sing while playing with the page together).

Here's the finished product. (I forgot to take a picture of it when I first made it so doesn't look as nice since Koala used it a lot). 


Pigeon riding the bus- he still doesn't get to drive!


Koala playing with the page- putting pigeon in the bus. 

Sunday, March 15, 2015

Quiet book: piggy bank & purse

Piggy bank:
This page has a pretty simple concept of putting money in the piggy bank. 
I found a piggy bank  quiet book page that I liked on Pinterest. 

On one side she had a cute pig that you could put coins into. Then on the other side of the page, there's a pencil case bag that catches the coins. 
I decided to combine the piggy bank page with a purse page like this one 

I thought instead of having a pencil case on the backside of the piggy bank page, why not have a purse there. Then the money can go in the piggy bank and then it goes in the purse and can be spent lol! (lol I know, I know that's the opposite concept of saving!)

For the piggy bank page, I traced the pig from the one page because I thought the pig was cute. 


I cut a slit at the top and reinforced it with Pellon. I also made sure to sew it to the inside of the purse page on the back so that when the coins go in, they fall into the purse on the other side. 
I was going to use juice tops like the other website. I bought the frozen juice just so that we could have the juice tops for the coins but Hubby recycled them before I could grab them. So I ended up getting play coins instead. 


I couldn't get a good picture but you can see the inside of the purse (the brown and red) when you open up the piggy bank. 

For the purse, I didn't want to just make a generic looking purse. I modeled my purse after the LV neverfull- only the best for my Koala! 😉


I initially thought about making this page into a weave page. 

But to make the neverfull look realistic, the strips of felt would be too thin and probably wouldn't survive as a weave page.
I used dark brown and tan felt which I cut into thin strips. In retrospect, I wish I used a regular brown rather than the tan because I think that would've matched the color of the real purse better. But I didn't want to redo it. 
I then took the strips and weaved them together to make the checkerboard look. Then I sewed the pieces to a piece of Pellon.
When that was done, I set that aside and worked on the inside on the purse. On the inside of the purse I made the slit from the piggy bank look like the zippered pocket of the inside of the purse. And of course, since the Neverfull is lined red, I put red felt on the inside and sewed that all down. 


This is what it looks like from the top looking in.  (I didn't snap a picture of what it looked like before putting it all together.)
 I then sewed that checkered pellon piece to the back page of the piggy bank. 


Somehow the purse ended up slanted on the page which kind of bothers the OCD side of me but it was too hard to redo so I left it. 

I added accents to make the purse look realistic- leather trim and metal rings. 

The page looks pretty bare to me and I keep thinking I need to add something to the background but not too sure what to add so for now, the page is done.