Showing posts with label BBC. Show all posts

Tuesday, June 2, 2015

Bow ties and Onesie Cardigan


My first project that I worked on after creating my new craft workspace was to make some bow ties to Baby Bear (BBC). 
I found some material that I had leftover from my bibs that was too small to make bibs with but perfect for bow ties. 

I found simple instructions on how to make a bow tie. I actually just looked at the pictures on a pin on Pinterest. But here's the link for that pin.

1. Cut out a rectangle. 
2. Fold the top and bottom horizontally about a quarter of the length
3. Fold the sides vertically so they meet in the middle. 
4. Some unpictured steps: scrunch the middle of the fabric and take a small piece of fabric and sew or glue it to hold the bow tie together. 
The pin showed a double bow tie. I only made one double bow tie because it looked funny with the other ones. 

Mustache bow tie 
Top: Blue plaid bow tie and chevron bow tie (you can't really tell that it's chevron)
Bottom: St. Patrick's Day bow tie 

The hardest part for me was getting the bow tie to look symmetrical. I still felt that the bow ties weren't symmetrical but I let it slide. 

I was going to add a snap to the back to snap onto a shirt but I decided to use safety pins so that I could use the bow ties on any shirt. 

In addition to the bow ties, I made BBC a cardigan from a onesie. This blog gave good instructions on how to make it 


1. Start with a onesie
2. Use a ruler and draw a Y shape on the front of the onesie. Cut on these lines. Also cut off the back collar 
3. Pin bias starting from the middle of the Y to go around the back collar (that was cut off) and then down the front to the bottom. 
4. Sew the bias to the shirt. Sew the two sides of the shirt back together under the bias. (It looks crooked in the final picture but it's not that crooked.)

Add buttons to the bias and viola- you have a onesie cardigan. 


Monday, May 18, 2015

DIY Baby Shortall

I searched for my next project on Pinterest and saw this blog where you can make shortalls from an adult shirt. I remembered I had some of Hubby's polo shirts I wanted to get rid of so I looked up tutorials for polo shirts. This one showed how to resize an adult polo to a kid size. 


I skimmed both blogs and decided to try to make a polo shortall from Hubby's polo shirt. It was an old shirt so I didn't mind if I messed up. 
On Saturday when both kids were napping, I busted out my sewing scissors and started to cut. 
I'm not very good at reading directions or working with patterns so I skimmed the blog pictures and grabbed one of BBC's shortalls to use as a template. 


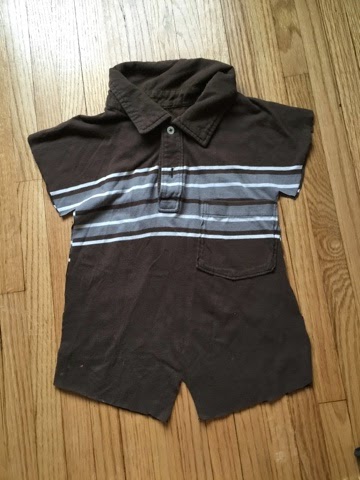
I cut about an inch around the shortall on the left side then folded the shirt in half and cut based on the other half so that they would be symmetrical. 


I ended up with this cutout. 


I detached the collar by pulling out the stitches. 


Then I sewed the edges of the leg holes and arm holes to create a hem. And then I sewed the pieces together at the tops and the sides- leaving the section in between the legs open so I could add snaps later.
After everything was sewn together, I had to cut the collar to fit the head opening and pinned it to the shirt.


 I cut the collar from one side thinking I could save myself from having to sew both sides. I learned that next time I should cut from both sides so that it's symmetrical. 


I added the snaps using this snap kit. The kit was easier than when I tried to attach snaps without the kit for the quiet book, but it was still pretty frustrating. 


This is the final product- not too bad for an evening project. It would've gone by faster if my thread didn't keep bunching and breaking- just a reminder that I'm still not crafty lol! But easy enough that I'm excited to try it again with other shirts! Next time I'll have to make the legs a little slimmer and longer. I think I will also cut the crotch a little higher so the pants are longer and the torso is shorter. 


Pretty cute to see BBC wearing outfits that Hubby wore.